Discover and test the threat vectors in your Azure environment with each BreachRisk™ assessment.
Securely integrating your Microsoft Azure account with BreachBits can be done by following the steps in the guide below:
- Create an Azure application for BreachBits. To begin, navigate to the App registrations page in your Azure Portal.
If the link above does not work for you, select 'Create a resource' in the Azure Portal homepage, and look for 'App registrations' under the 'Other' section of Azure resources.
-
- Select 'New registration' at the top of the App registrations page.

- Add a name for the application and select the first option in Supported account types. Then select Register. For this walkthrough, we are naming the application breachbits, but any name will work - just remember what it is, because you will have to search for it in later steps.

- You will be brought to the management page for the newly created application. Here, copy the Application (client) ID and the Directory (tenant) ID. These are 2 of the 3 required pieces of information you will need to provide BreachBits.

- Select 'New registration' at the top of the App registrations page.
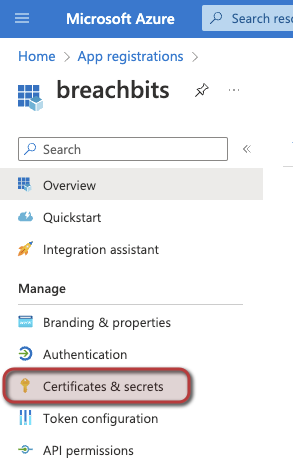
- Create a Client Secret for authentication. On the same page (Application homepage), select Certificates & secrets from the left navigation bar.
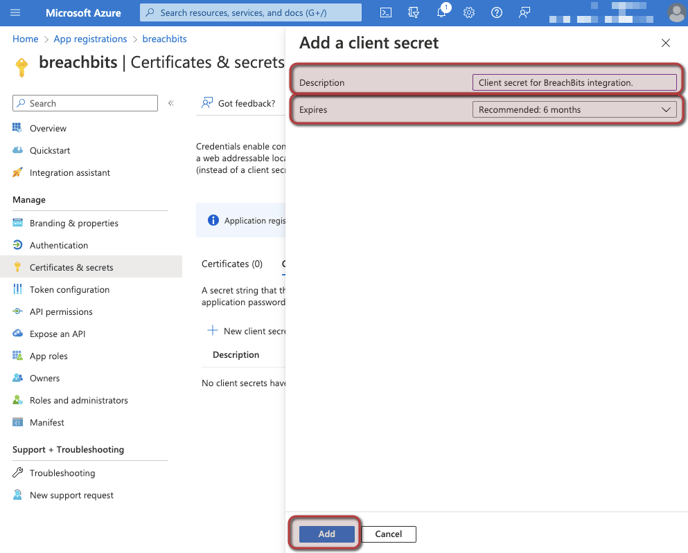
- Select New client secret and add a description and desired expiration duration for this client secret. Note: Select an expiration duration you are comfortable with and aligns with your company's policy. Once the client secret expires, you will need to generate a new client secret and re-integrate your Azure environment with BreachBits.
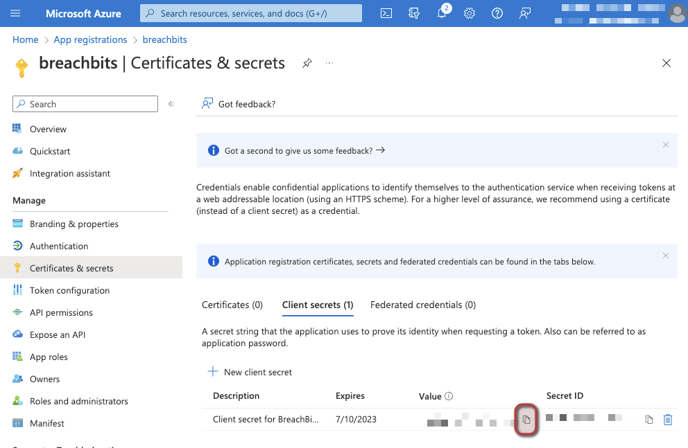
- Copy the value of the new client secret. Be sure to copy the text under the Value column, and not the Secret ID. This is the final piece of information you need to save to enable your integration.
- Select New client secret and add a description and desired expiration duration for this client secret. Note: Select an expiration duration you are comfortable with and aligns with your company's policy. Once the client secret expires, you will need to generate a new client secret and re-integrate your Azure environment with BreachBits.
- Add security and access roles to your application. Now that you have created an application for BreachBits to use to access your Azure environment, the next step is to authorize what can be accessed by BreachBits. To begin, navigate to your list of Azure subscriptions, found here: Azure subscriptions.

For each subscription listed on the page above, perform the following actions:
- Click on the subscription name, which will bring to you the management page for that subscription.
- Select Access control (IAM) on the left navigation page.

- Now, add two roles to the application created in step 1. These two roles are Reader and Reader and Data Access. To add a role, select the Add button and then the Add role assignment from the dropdown.

- In the search bar, type in the role you are searching for. The first role should be Reader. When you find it in the list below, select View.

- The next screen will give you the chance to review the permissions granted in that role. Select Select role at the bottom of the screen. Then hit Next on the following screen.

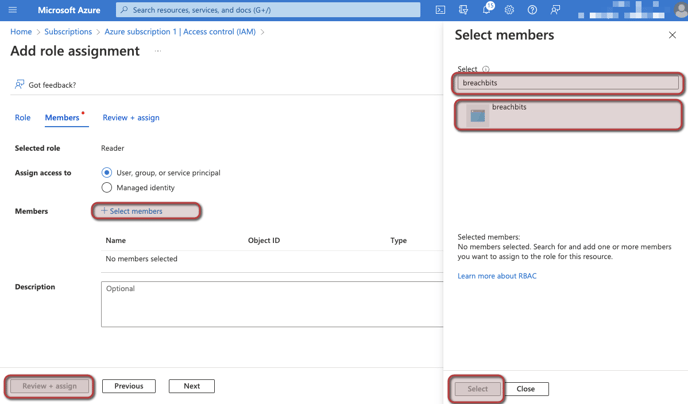
- Now, assign that role to the application you created. Click Select members, and search for the name of the application you created. When you have found it, click on the application and hit Select. Lastly, select Review + assign.
- Now, add the second role of Reader and Data Access. Start at step d and add this role.
- Assign Azure Active Directory (AD) permissions to the application (optional). If you would like to take advantage of Azure Active Directory (AD) assessments for BreachRisk™ for Business Premium customers in upcoming releases, follow these steps to add assign the Azure AD role of Directory Reader to your application. If not, please proceed to the final step.
- Navigate to the Roles and Administrators page for Azure AD by using this link . Search for the role Directory Readers and view the description using the three-dot ellipsis at the end of the highlighted row.
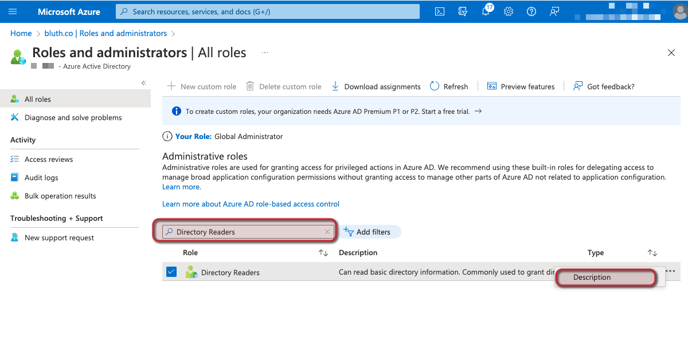
- In the Directory Readers role page, select Add assignments at the top and search for the name of your application. Select the application and click Add.

- Navigate to the Roles and Administrators page for Azure AD by using this link . Search for the role Directory Readers and view the description using the three-dot ellipsis at the end of the highlighted row.
- Connect your BreachBits account to the Azure application. Log into your BreachBits Dashboard and navigate to the Cloud Integrations page in the BreachRisk™ for Business the navigation menu on the left.

- In the Cloud Integrations page, select the Integrate button under the Azure logo.

- On the Azure integration page is where you will add the three values copied from steps 1 and 2 above - these were the Application (client) ID, the Directory (tenant) ID and the Client Secret. Add these values to the corresponding fields, as well as an optional description, and select Start Integration.

- Now you will see a green Integration Active button under the Azure logo. In the tables below, you will begin to see your Azure resources populate, such as databases (in the database table), Azure VMs or servers (in the compute table), storage blobs (in the storage table) and static applications or Azure app service applications (in the apps table).
- In the Cloud Integrations page, select the Integrate button under the Azure logo.
Congratulations - your Azure integration is complete. What's next?
- With your Azure integration complete, during each BreachRisk™ assessment the integration will be leveraged to query for your Azure resources during the discovery phase of the BreachRisk™ process. These Azure resources (in addition to resources discoverable by BreachBits and attackers) will be lightly scanned, crawled and analyzed, looking for any threat vectors that exist in your Azure environment. For BreachRisk™ Pro and Premium customers, these threat vectors will also be tested, as long as Penetration Testing is enabled and the vectors are marked as in-scope. These threat vectors can be found on the BreachRisk™ Technical page.
What if I want to disconnect my Azure integration?
- Disconnecting your Azure integration is easy and can be done at any time. Simply click on the Integration Active button under the Azure logo at the top of the Cloud Integrations page. With one click, the details you provided for the application will be securely deleted and your integration will be disconnected.
If you disconnect your integration from BreachBits and do not intend to re-enable it, be sure to remove the application created in step 1 of this guide above. Disconnecting the integration in your BreachBits Dashboard does not delete this application, only BreachBits' authorization to connect to it.
